Build a Simple URL Shortener with Cloudflare Workers
Technologies:
What is a URL Shortener
A URL shortener is a simple web application that creates friendly endpoints to redirect users to other comparatively longer URLs.
Example:
Redirects to
https://www.youtube.com/channel/UCys1yNug8mktjY5uLLBQ9Lg
URL shorteners often also have other behind the scenes features such as
- Tracking of what links get hit
- Protection against malicious sites
Some examples include twitter’s t.co, and bit.ly
Why Cloudflare
Cloudflare workers is a serverless framework, where our code is run only when theres a request to it. Cloudflare allows us to distribute our code across the entire world. They ensure low response times and essentially 100% uptime.
Cloudflare’s free plan is also very liberal, allowing 100,000 requests, entirely for free. If you manage to outgrow this, for only 5 bucks a month you get 10 Million requests.
Lets build it
To get started install wrangler, the cloudflare worker cli. With either
yarn global add wrangleror
npm install -g wranglerTravel to your chosen project directory and run
wrangler initto scaffold out your project.
Wrangler Options
Wrangler will prompt you with a few options
Would you like to use git to manage this Worker? I personally recommend using git, but it won’t be covered in this tutorial. Use your own discretion
No package.json found. Would you like to create one? Yes
Would you like to use TypeScript? Yes. Cloudflare has first class TypeScript support, including in its build system. Instead of having to build TypeScript yourself, Wrangler handles it all themself
Would you like to create a Worker at src/index.ts? Select
Fetch Handler
Run it in dev mode
In your terminal, run
yarn startor
npm run startIf you haven’t used wrangler before it will open a link to authorize it to access your account. If you don’t have an account go ahead and make one.
If you’ve done all the steps correctly, opening localhost:8787 should display “Hello World!” in plaintext.
Cloudflare KV
Creating the namespace
Cloudflare KV is a distributed Key Value database that is run on the same cloudflare network as our code. Due to this, fetching a value is incredibly fast.
We’re going to want to add a KV binding to our wrangler.toml
Run
wrangler kv:namespace create DBThis creates a KV namespace named “link-DB”.
I got this output:
🌀 Creating namespace with title "test-DB"
✨ Success!
Add the following to your configuration file in your kv_namespaces array:
{ binding = "DB", id = "<ID>" }
The cli recommends adding that line directly, however cloudflare’s documentation prefers using Toml’s Array of Table syntax for the configuration.
At the bottom of your Wrangler.toml add
name = "test"
main = "src/index.ts"
compatibility_date = "2022-07-24"

[[kv_namespaces]]
binding = "DB"
id = "<ID>"
Substituting <ID> for the id you got from wrangler.
If you now attempt to start your code you will be greeted with this error
✘ [ERROR] In development, you should use a separate kv namespace
than the one you'd use in production. Please create a new kv
namespace with "wrangler kv:namespace create <name> --preview"
and add its id as preview_id to the kv_namespace "DB" in
your wrangler.toml
This is because we actually need two KV stores, one for production (which you just made) and one for development. To make a dev kv store run
wrangler kv:namespace create DB --previewThis creates a new kv namespace specifically for development.
You will now get
🌀 Creating namespace with title "link-DB_preview"
✨ Success!
Add the following to your configuration file in your kv_namespaces array:
{ binding = "DB", preview_id = "<PREVIEW_ID>" }
Return to wrangler.toml and add your preview id
[[kv_namespaces]]
binding = "DB"
id = "<ID>"
preview_id = "<PREVIEW_ID>"
Using Cloudflare KV
Lets go to our src/main.ts. Replace everything in it with. (It’s the same code, we just remove all the comments)
export interface Env {}

export default {
	async fetch(
		request: Request,
		env: Env,
		ctx: ExecutionContext
	): Promise<Response> {
		return new Response("Hello World!");
	},
};
The way our link shortener will work is by taking the path our worker is requested at and looking it up in our KV database.
First we’re going to want to extract the pathname from the incoming request.
export default {
	async fetch(
		request: Request,
		env: Env,
		ctx: ExecutionContext
	): Promise<Response> {
		// Create a wrapper for the URL
		const url = new URL(request.url);

		// Remove the "/" from the beginning of the path
		const key = url.pathname.substring(1);

		return new Response(key);
	},
};
Next we want to separate our requests based on whether there is a path.
export default {
	async fetch(
		request: Request,
		env: Env,
		ctx: ExecutionContext
	): Promise<Response> {
		const url = new URL(request.url);
		const key = url.pathname.substring(1);

		// What we want to return when the user requests our base/index route "/"
		if (!key) return new Response("No Key specified");

		// Only gets run when our route isn't "/"
		return new Response(key);
	},
};
Next we’re going to want to look up our key from our KV database. First find at the top of your index.ts file your ENV interface. Then add inside it, a binding to your KV database
export interface Env {
	DB: KVNamespace;
}
With our new env interface finally set up, we can look up the key we got from our path, and redirect the user to that link.
export default {
	async fetch(
		request: Request,
		env: Env,
		ctx: ExecutionContext
	): Promise<Response> {
		const url = new URL(request.url);
		const key = url.pathname.substring(1);

		if (!key) return new Response("No Key specified");

		// Look up the key from our redirect
		const redirectValue = await env.DB.get(key);

		// If the looked up value does not exist (null) return
		if (!redirectValue) return new Response("No matching value");

		// Redirect to the looked up value
		return Response.redirect(redirectValue, 301);
	},
};
Finally we’re going to want to actually populate our db with the data we want.
Open the cloudflare dashboard at dash.cloudflare.com
Go down under Workers and select KV.
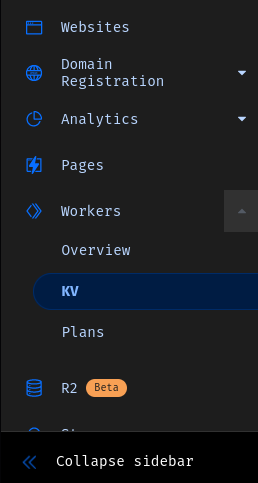
Where you see the list of all your KV stores find where it says

and select “View” on your preview DB. Note: For dev mode you must add the value to your preview DB not your production one
Scroll down until you see the UI to add entries to your KV store. For the key, add the path the user will access your link at, and for the value add a standard URL.
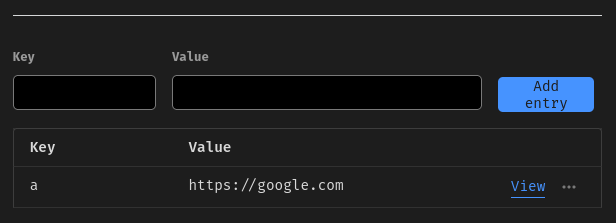
Finally test your code, if you access your dev server with your value as the path, you should get redirected to your chosen link.
Returning HTML
If you had at any point attempted to run something like
new Response("<h1>Fancy HTML</h1>");You wouldn’t of gotten your HTML to render, thats because the browser still thinks that the Response body is simply plain text.
Lets add a new function to help fix that.
function HtmlResponse(html: string): Response {
	return new Response(html, {
		headers: {
			"content-type": "text/html;charset=UTF-8",
		},
	});
}
This returns a response with a custom header, which informs the browser that the returned text is html, not plain text.
We’re going to want to return an html page, in two main events, when a user accesses our root ”/” path, and when a user accesses a value that does not exist in our database.
Lets create the HTML page. Create a new file in your src directory called htmlData.ts. In this file we’re going to put
export const htmlData = {
	index: ``,
	error: ``,
};
The backtick syntax creates a syntax literal, meaning we can create a multi-line string, without having to worry about escaping new lines or whitespace at the beginning of the each line.
In these you can put your own HTML, but here i’ll put mine. You can view it in action by requesting my link shortener with any invalid value
TIP: Create a temporary HTML file and write your code in there, then copy and paste it into your source code.
export const htmlData = {
	index: ``,
	error: `
<!DOCTYPE html>
<html lang="en">
	<head>
		<meta charset="UTF-8" />
		<meta http-equiv="X-UA-Compatible" content="IE=edge" />
		<meta name="viewport" content="width=device-width, initial-scale=1.0" />
		<title>Error</title>
	</head>
	<body>
		<style>
			main {
				text-align: center;
				color: #ebdbb2;
			}
			a {
				color: #458588;
			}
			body {
				background-color: #282828;
				margin: 0;
				font-size: larger;
			}
		</style>
		<main>
			<h1 style="margin: 1em; font-size: 3em">:(</h1>
			<h1>An Error has Occurred</h1>
			<p>
				Your redirect value <strong>{VALUE}</strong> does not appear
				to point to a valid URL
			</p>
			<p>
				<a href="{WEBMASTER_LINK}">
					If this appears to be an error, contact
					<strong>{WEBMASTER}</strong>
				</a>
			</p>
		</main>
	</body>
</html>`,
};
Notice that I used a few placeholder values in the HTML source, we will replace those dynamically.
Back in your source code, rewrite the error and root case with
// Make sure you add the import at the top of your file
import { htmlData } from "./htmlData";

export default {
	async fetch(
		request: Request,
		env: Env,
		ctx: ExecutionContext
	): Promise<Response> {
		const url = new URL(request.url);
		const key = url.pathname.substring(1);

		if (!key) return HtmlResponse(htmlData.index);

		// Look up the key from our redirect
		const redirectValue = await env.DB.get(key);

		// If the looked up value does not exist (null) return
		if (!redirectValue) return HtmlResponse(htmlData.error);

		// Redirect to the looked up value
		return Response.redirect(redirectValue, 301);
	},
};
Dynamic data in our html
The last step we have is to replace parts of our error page with dynamic data. If you used my html code then these replace statements should work.
// If the looked up value does not exist (null) return
if (!redirectValue)
	return HtmlResponse(
		htmlData.error
			.replace("{WEBMASTER}", "Your Name")
			.replace("{WEBMASTER_LINK}", "Your Resume")
			.replace("{VALUE}", url.pathname)
	);